Face it, you’d rather have Beasty Blue Pox than Blue Waffle (also don’t Google that). Although I guess both are as bad as each other if the common source is, Beasty. Enough of that shit. Here’s the latest.
This has actually turned out to be a mammoth post. Read, don’t read.
I actually grew a set and decided that today was the day I was going to hook up some power to the boat. Risking life and limb as per usual. If you recall, the boat yard electrical units were knee deep in water after the floods. Hence my hesitation on using them. The plan was to hook up the power and get to work on getting the bevels sorted around the bigger holes in the boat.
Here’s a cute video of me hooking up the power. I think I may have failed to mention I spent £12 on a selfie stick type thing a few weeks ago. It’s pretty nifty for £12 to be fair. It includes a tripod, a little remote button for when you’re using the tripod, has a light for something or another, and of course it has an extending arm/leg/stick thing.
/* start sarcasm*/ Being a massive boat influencer I thought it was time to up my game a little and make my videos just a little more professional. /*end sarcasm*/
I set up the tripod part of the selfie stick in the cubby hole, added my phone and pointed it in the general direction of the electricity outlets. The thinking was, if I got electrocuted, and didn’t come home, the search party would find my fried remains at the boat yard and at least know how I managed to deep fry my bollocks.
I was going to try and be funny (as if I need to try!) and pretend to get electrocuted, fall to the ground and then edit the video later to make it look like I’d snuffed it. Second thoughts crept in though after looking at the ground, it was muddy, covered in miscellaneous boat detritus, and not least of all, I have relieved myself in that area far too many times to count. So I thought better of it.
In the end I didn’t even use the bloody electricity.
I know you’re all dying to see my “selfie stick” so here it is in all its splendour:

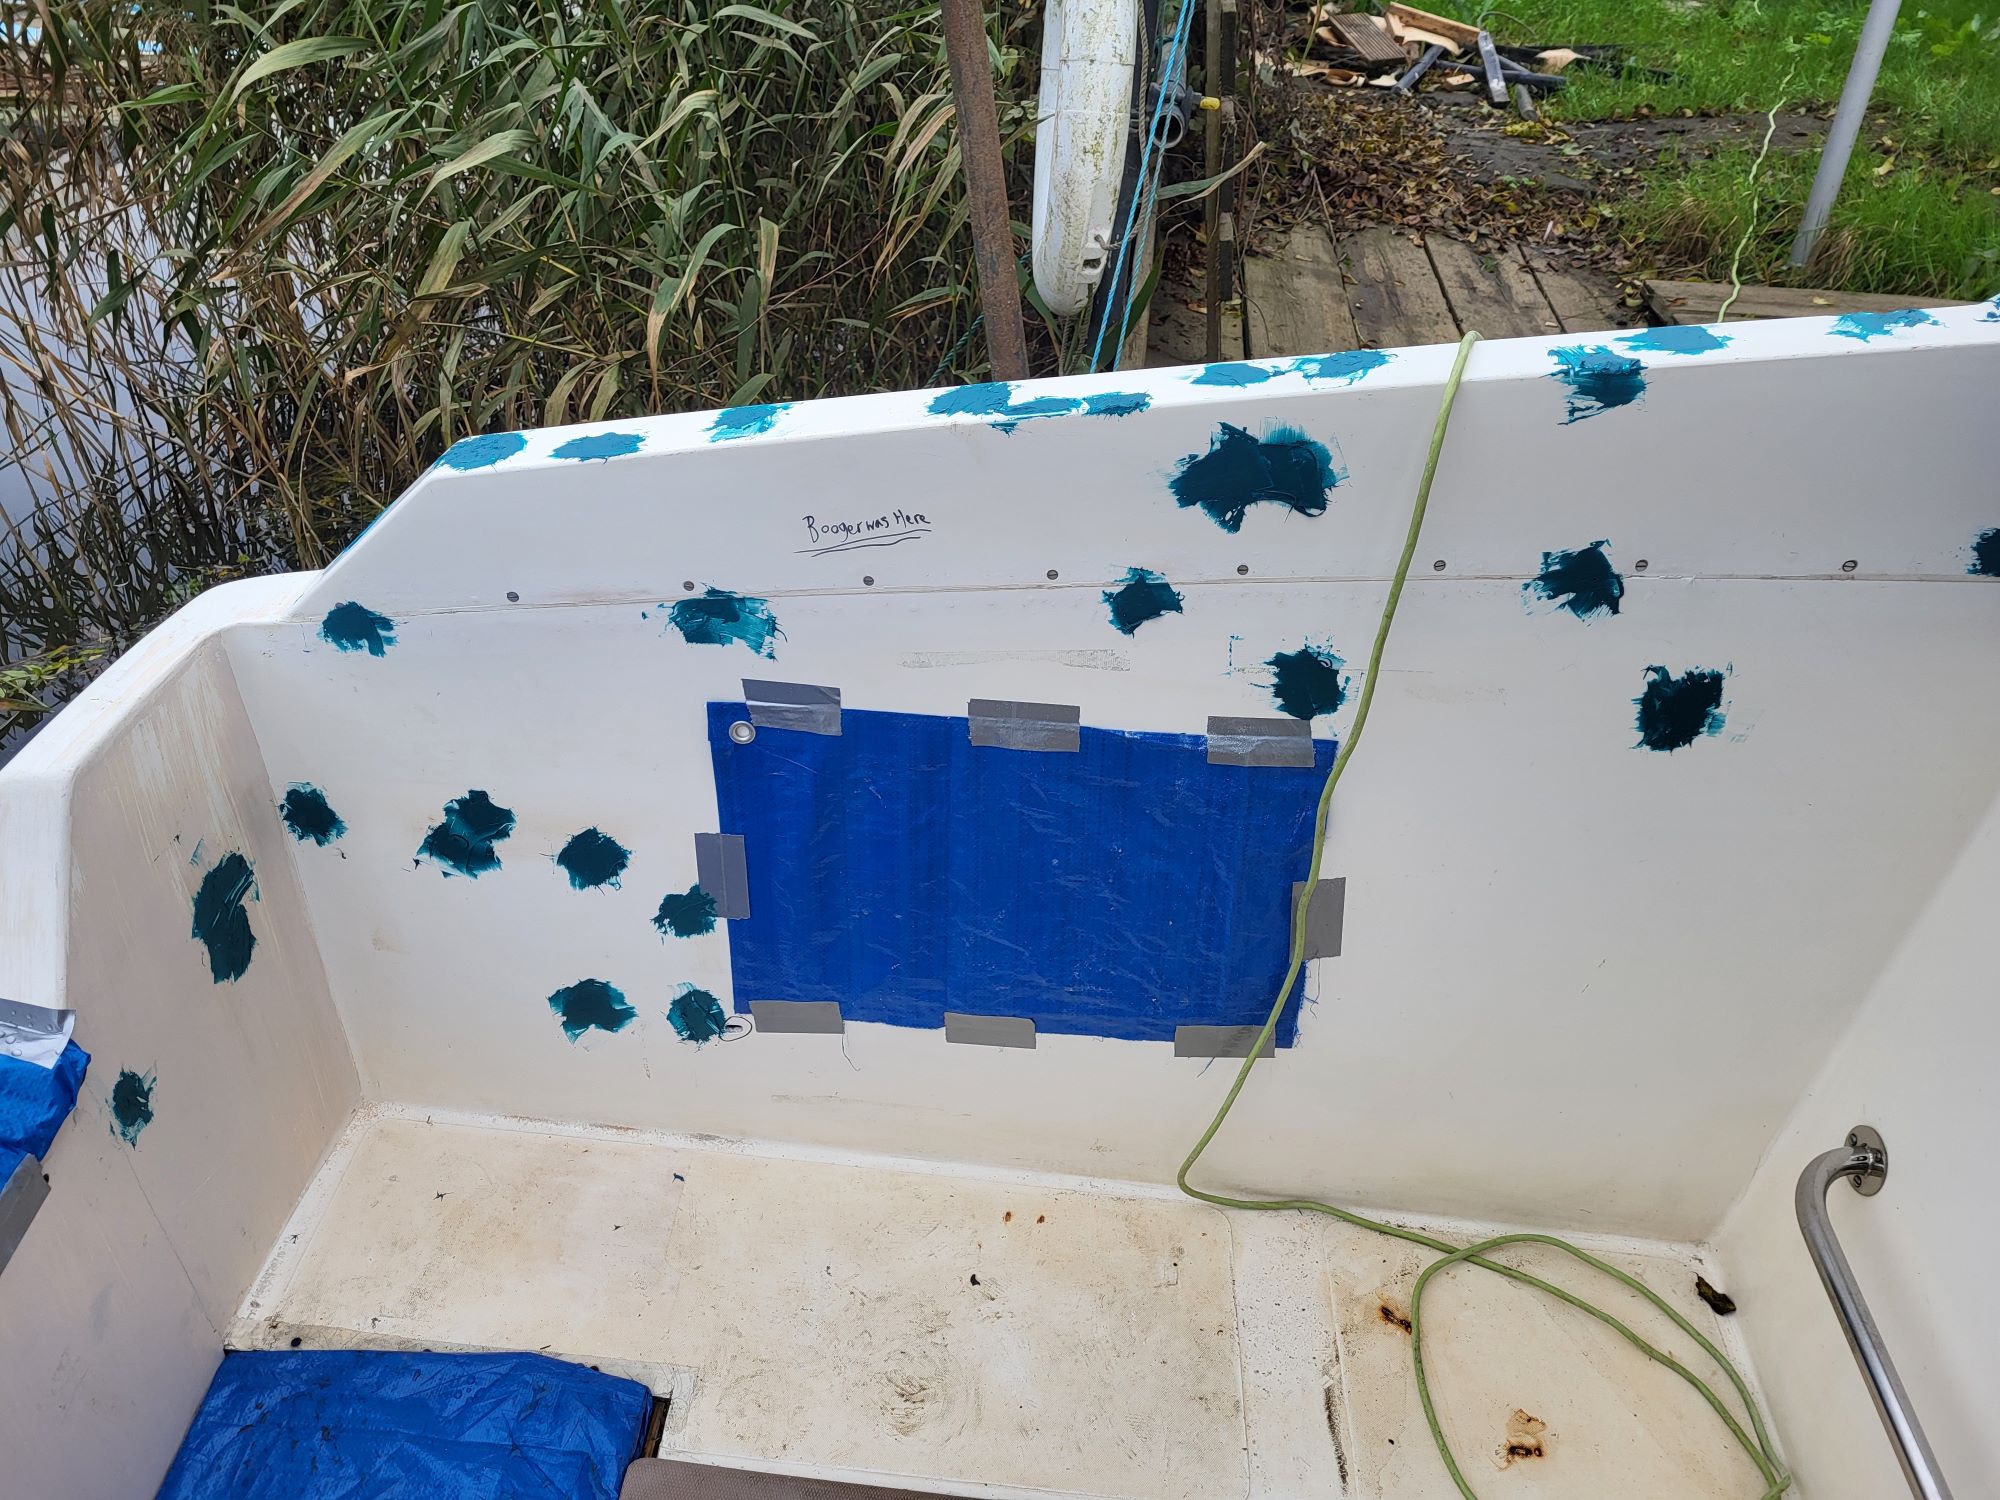
In my last update I covered how I cleaned and tidied up the cockpit and identified all the screw and bolt holes that needed filling. Marked with Sharpie, which I said I may regret. As it turns out, not so much regret and more of a congratulatory pat on the back for myself for my ingenuity. More of that in a bit. Happy I now had power to the boat I went off and started a task that had no need for electricity whatsoever. The dreaded fibreglass filling of all the identified holes. In my past life as a boat wanker I used this stuff for abso-fucking-lutely everything. I grew to hate the stuff. For two reasons:
- I never knew how much hardener to mix with the filler. Yes, they do give you instructions on the ratio to use, but when they use comparisons like: “Get a golf ball sized amount of filler and add 5 cm of hardener to it and mix well”, I tend to drift off. Exactly how big is a golf ball sized amount of filler exactly? I know how big a golf ball is, I’m not entirely thick, but never having played anything but crazy golf, I’m not exactly an expert. Also, who the fuck has a golf ball conveniently stored away at a fucking boat yard for easy comparisons? Not I. Also as you all know, us men tend to over exaggerate size when it comes to the size of balls and as a result I always tend to get the measurements wrong and run out of hardener..
- The stuff is uber-fucking-expensive for what you get. I am convinced the manufacturers intentionally supply less hardener than you need for the whole tin of filler. In fact I am 100% sure of it. I also don’t like the colour. Why a pukey blue/green? Why not a primer grey or even white? See below an image of what I mean about size of hardener supplied with a tin. If that hardener is enough for the whole pot, I’ll be smearing that stuff in inappropriate places instead of remembering to take a blue pill ahead of date nights. If those ever happen again.

Anyway, I spent a good few hours plastering the filler all over the show and as a result the cockpit was looking less like a boat restoration project and more of a colour-blind kid’s project trying to draw pictures of Mr Tumble and his set. I managed to get all but 2 holes filled before I ran out of, yep, you guessed it, hardener! Not a massive catastrophe, they need a bit more work as they’re bigger than the others. I intentionally left them to last anyway.

By the time I started filling the last holes, the other patches were ready for sanding, so the timing was pretty good. I started sanding down the patches by hand using 80 grit sandpaper. By hand because I was nervous about using the electric sander (obvious reasons) and because the last time I used a sander on a boat I ended up putting gouges all over the body work.
/*insert brief interlude here*/ I’ve read on the internet (so it must be true), that when you’re sanding on a boat, when you’re doing structural work, use 80 grit and when you’re doing cosmetic, make-the-boat-look-pretty work you use 180 grit or higher. /* end brief interlude*/
Boy, did it take absolute ages to sand these down by hand, in fact I spent about 3 hours sanding, and didn’t even get through half of the patches. Thankfully I had my music on and that helped kill the tedium. Not quite sure what the other occupants of the boat yard thought of my spontaneous but short headbanging sessions, like I care anyway.
My little spurt of Sharpie ingenuity comes to the fore here. As you’re sanding the Sharpie drawn circle starts becoming clearer and clearer through the patch and eventually starts to disappear as you sand. When it’s completely gone, you know that’s as far as you need to sand. Fucking clever innit? After each patch was sanded I checked its smoothness with a finger and if it wasn’t smooth I marked it with another Sharpie circle. That way I know which holes need a second round of filling. I was completely expecting this to be the case, and it’s going to be handy for the second round of filling.
I refuse to go out and buy another pot of filler, there’s still loads left, and I also refuse to go out and buy just the hardener because you may as well buy the whole shebang at the prices they charge. Instead, I’ve brought the filler home and I’m going to use the hardener I got with the fibreglass kits I’ve been using for all the backing plates I’ve been making. It’s the same colour, so surely must be and do the same thing, right? I’ll do a bit of testing in case I inadvertantly build an atom bomb, or worse yet, set the garage alight.
My brain is going to be itching all week to get up to the boat and finish the patches off. Hopefully I can. We’ll see.

It’s funny how much thinking you do when in solitude, doing a menial task, in my case my brain goes into overdrive. Most of the time it’s just filled with absolute bullshit, but sometimes, just sometimes it manages to even surprise me at the magnificent things it can come up with. Today was one of those times. I made two decisions about the boat:
- I won’t be buying the expensive boat cover I mentioned in my previous post. Not just yet anyway. For various reasons, and have decided that I’m going with Zed’s Version 2 suggestion of using a tarpaulin to act like a cover.
- If I spend the £570 now, that’s £570 I won’t have for other things that may be more pressing (LIKE FUCKING HARDENER FOR FILLER!).
- If I buy it now, with all the work that still needs to be done on the boat, it’s going to get ruined.
- As it happens, whilst writing this post up, I checked my emails and I had a response from the cover people. They no longer have the template for my boat, so that solves that issue. For now.
- I won’t be fixing the cockpit floor. Instead I have come up with an alternative plan.
- This plan will cover the fuck-pit hole, extend the “living area” of the boat and add some extra storage space.
- Instead I am going to build a U-shaped, hollow but strong bench that surrounds three sides of the engine bay cover.
- Devise a way that allows me to add a detchable table to the engine bay cover for those sunny days I’m anchored in the Med and sipping Pina Coladas.
I know, I know, let me draw a picture for you in case that makes no sense at all, and explain after. Also, excuse the mess but I am left handed, and untalented.

Okay, before anyone starts at me *Looks over to Zed*, no I am not taking a shortcut by just building over the other holes. How I’m going to do that I don’t know just yet. Before I even think about the bench I’ll be fixing those other holes, including the old locker cut outs. But before I even do that I need to get the engine bay sorted, fix Pork Pie 1 &2, and Spongebob.
There’s some work that needs to be done inside the engine bay, like a good fucking scrub, and some repair work and then a paint. There’s also the question of the shelves inside those side lockers. Those need sorting, the old fuel tanks are sitting on them and those need to come out, etc, etc. But once that’s all done I’ll go ahead with my bench. All the bits that need repairing are more accrssible now anyway, and there’s a lot more that neds to be done to the boat before I even consider starting this.
- Bench will be same height as transom.
- There will be a rail over the transom (That’s the little black rectangle in the picture)
- Left and right benches will be hollow for storage
- Benches will be wood and plywood, glassed in and reinforced with structural fibreglass – by this point I should be a dab hand at fibreglasing
- Black T on engine bay will be the table
- Leg to be slotted or screwed into engine bay lid and will be easily dissassembled
- Table top and leg to be stored in engine bay
- Blue square will be nice type of wood to replace step. I may do it the other side too.
- There’s plenty of space left between engine bay and cabin door to install a driver and passenger seat.
What this does is leave a nice rectangular area on the cockpit deck to get covered. Aaah, decking for the cockpit. I’ll get there in a second.
This post is already far too long so I may as well carry on with it.
Let me stop for a quick semi-related aside:
Owning a boat has been an obsession for years, long before I even owned and then subsequently fucked the first one. Like everyone else, life seems to get in the way of things that make us happy, not to mention COVID, the little bastard. My “owning a boat obssession” has been on the backburner for years since I had the first one. That’s nobody’s fault really, it is just what it is.
I’m now in the very fortunate position to be able to rekindle that obsession, and that lends itself well to how my brain works. Whether it’s ADHD or Autism or whatever the fuck is wrong with me. I just know I’ve not been this happy in fucking ages. That’s not to take away from the friends, family, partners, girlfriends, and one night stands that I have surrounded myself with over the years, because they provided happiness, just a diffferent sort of happiness. So, I’m going to get very boring very quickly for a lot of people, and that’s ok. Do what makes you happy. I know I fucking am!
Just putting that out there, the shit I write doesn’t get read too often, so thought I may be able to sneak it in.
Alright, enough of that shit. Decking. Way back before anyone knew about the boat, I was busily obssessing about the fucking thing, my brain overthinking about all the cool wonderful things I could do with the boat. One of those things was decking. Not exactly an excting subject I’ll give you that, but I knew something needed to be done for the cockpit, I just wasn’t sure what. Cue doing a quick Google for boat decking. For some reason a company called Dino Decking was in the results of that search. I took a little peak.
They do composite decking, which I guess means their product isn’t all wood, or something to that effect, I didn’t bother reading too much, I wanted to take a look. It actually looked very cool, and I thought it’d be a very good solution for the boat. So I sent off for a sample (free of charge – Yay!) and they sent me out samples of the types of decking they do. Again, another dodgy parcel arriving at the house when no one knew about the boat. Ha! I really, like really, really liked what they had to offer.
I shot off an email asking whether they’d ever had any clients who had used their decking for boat decking and how had they attached it to the boat, sadly their answer was no, and their advice was it was probably not ideal for their product to be in close proximity to water for prolonged periods and that there wasn’t an installation system of theirs which would be suitable for boat installation.
Now wait a minute, they’re a garden decking company in England, so what exactly does their product do, outside of looking bloody nice then? England, that place of constant sunshine with barely any rain all year. Fuuuuucking hell. The whole point of a boat is to keep it on water and avoid as much water coming inside the boat as possible. Am I being too harsh? Maybe. Anyway if you’re in the market for decking go check them out, the installation systems for your stock standard garden decking look pretty cool and easy. This is not a sponsored post, I promise. I just think they have an ace product, regardless of my opions on water proximity.
Take a look at the decking though, I think it rocks. I’m partial to the Mocha and Walnut ones (Walnut is of course the one where the label has been cut off in the photo), the cool thing about the decking is, it is double sided. I quite like the grooved side. The prices don’t seem too bad either. £24 for a 4 metre length,. I reckon 2 of those cut down to size will be more than enough to cover the area leftover once the bench has been built. I’m sure you’ve already guessed, that regardless of their opinion I’m going to use them. The onus is on me to keep the boat dryer than England through all seasons. I’m sure I’ll be able to manage that. Doing what makes me happy. Within reason, natch.
